How do I install a suspended or hanging ceiling?
Let me begin by mentioning: When you install a suspended ceiling you should do a bit more research than just this page. Our intent is to show you how EASY it is to install a suspended ceiling. Your local hardware store, Home Depot or Lowell’s will have more information to assist you.
Overview: Suspended ceilings offer many advantages such as reasonable cost, easy repair-ability in case of damage, fast finish, and great accessibility. A suspended ceiling can be very simple or fancy, but will always be a low cost ceiling that is easy to install. Ceilings that are hung from above provide easy access to your utilities such as plumbing, heating, and electrical services. One of the reasons commercial buildings use suspended ceilings is for the ease of running service lines such as computer wires, electrical, and plumbing lines to various places. Your home theater or star ceiling will benefit from the same flexibility and easy access. With such a large variety of design choices on the market, you should consider some of the decorator styles available for your home office or theater.
The Ceiling of Choice: For some, installing the “stars” in a suspended ceiling, is by far, the preferred method of creation! The ease of installation along with the ability to have future access for changes and repairs, proves this is the PREFERRED METHOD of creating your indoor universe. Later in our guide we’ll show you how to use acoustic panels in the installation of a star ceiling.
NOT your great grandma’s ceiling! Perhaps the #1 objection to installing a suspended ceiling is that it looks too industrial or “dated”. A visit to The “Ceiling Isle” of Armstrong.com will enlighten you as to what’s transpired in world of suspended ceilings! Here you will also find a wealth of installation information including an awesome project estimator. Check it out! Here are some examples from their site:


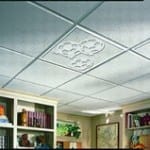


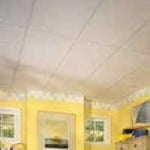


Here are some examples of tiles with more distinctive edge patterns to give your ceiling a look that that will have people calling you an interior decorator!
Easy Enough! Let’s take a look at a step-by-step guide to installing a suspended ceiling. (Elsewhere in our Star Ceiling guide, we will show you how to install the stars in this type of ceiling.)
| A large variety of suspended ceiling materials are available that can give you the finished look you desire. There are fancy embossed tiles, some with recessed supporting grids, and of course the popular 2’x 4′ smooth tiles. Our project installed a 2′ x 4′ grid with the popular sound absorbing tile. |  |
| Step 1. Determine the distance down from the ceiling you want (or need ) your finished ceiling to be. Keep in mind such obstructions as plumbing pipes as shown in Figure 1. Measure down from the ceiling in the corners using the measurement you determined would clear obstructions such as plumbing pipes. |
 |
|
Step 2. Snap chalk lines from corner to corner. This line will be the top of the L shaped wall rail. When you mount the wall rail with the chalk line along the top of the rail, none of the chalk will show in the room below, yet you will have a straight ceiling. |
 |
|
Step 3. Fasten perimeter rails to the wall with short nails or screws in each stud. |
 |
| Note: To have 2’x4′ panels you can purchase 2′ long cross pieces or 4′ long cross pieces. If you have 2′ long cross piece your main runners (T shaped grid piece, 12 feet long) will be spaced 2′ apart with the cross pieces installed every 4′. If you have 4′ long cross piece your main runners will be 4 ‘ apart with the cross pieces installed every 2′. Main runners can be snapped together (end to end) for rooms longer than 12’. | |
|
Step 4. Install main runners as described fastening securely to the ceiling above with hanger wire. Install cross pieces 2′ or 4 ‘ apart, snapping into the sides of the main runners. |
 |
|
Step 5. Install tiles from above, making sure they fall completely down into the grid work. |
 |
|
Step 6. Install lights and HVAC registers as needed. Fluorescent light kits can be purchased that drops into the ceiling grid work. This greatly simplifies the task of providing light to your new room. |
 |
Tools: Beside the actual ceiling panels and support grids, installing a suspended ceiling does not require a major investment in tools! Here are the additional tools you will need:
- utility knife
- ruler
- chalk line
- hammer
- screwdriver
- snips
- pencil
Conclusion: In our opinion, installation of your “stars” in a suspended ceiling is the way to go! (We’ll show you the step by step star installation, elsewhere in this guide)
If the room already has a finished ceiling with NO access from above, (ie: a basement home theater with finished rooms above) we would suggest you install a suspended ceiling. You will only loose a few inches and the results will still be awesome. Plus you will gain another way of running your surround sound speaker wires!
If you have a finished (sprayed or sheet-rocked) ceiling WITH access to the space above (ie: attic or crawl space) you might be able to install a star ceiling through the existing ceiling. However, it is a lot of work, requires TWO people and a lot of patience! We will cover this technique in a different area of our guide.